Showing posts with label DIY. Show all posts

Monday, April 30, 2012

I spy school

Images clockwise from top left are from: the bookfair, Maybe Matilda, Sweet Potato Chronicles, Target

I have not posted in a little while because I have been overwhelmed by school! I signed up for too many classes this semester. Thankfully, this is the last week. Only a few exams stand between me and more time for sewing. Since I have been consumed with school lately, I thought that I would share some school related goodness. 
 
This Etsy shop was created by Kate of the amazing blog Scathingly Brilliant. When I saw the Book Fair Button with stickers that you can apply as you finish your books, I laughed out loud. Children of the 80s-90s, how much did you love Book-it? I got my free pizza every single month!


I should make myself more bento style meals because I am a grazer. And they are just too cute. (My Love tells me that I eat like a child. I guess this confirms it...)


Friday, April 13, 2012

Luggage (or Decorative) Tag Tutorial


My Love has an ugly plastic luggage tag on his suitcase. I tease him about it every time he travels. So I thought that I should replace it with something better! I loved the tag that I created for him, so I thought I would share it with you. It takes quite a few steps to make, but not a lot of time. Enjoy!

Supplies

  • fabric of your choice (at least 11" x 9") Need fabric? Check out the Able to Sleep Fabric Shop!
  • fusible interfacing
  • washable fabric marker or chalk
  • coordinating thread
  • about 12" of coordinating ribbon
  • cardstock or scrapbooking paper
  • sewing machine, pins, scissors, etc.


Instructions 


1. Download the tag pattern from here. Print it out. (When you print the pattern, make sure that it is not scaled. You can double check by measuring the tag outline. It should be 5.5" by 4.5".)


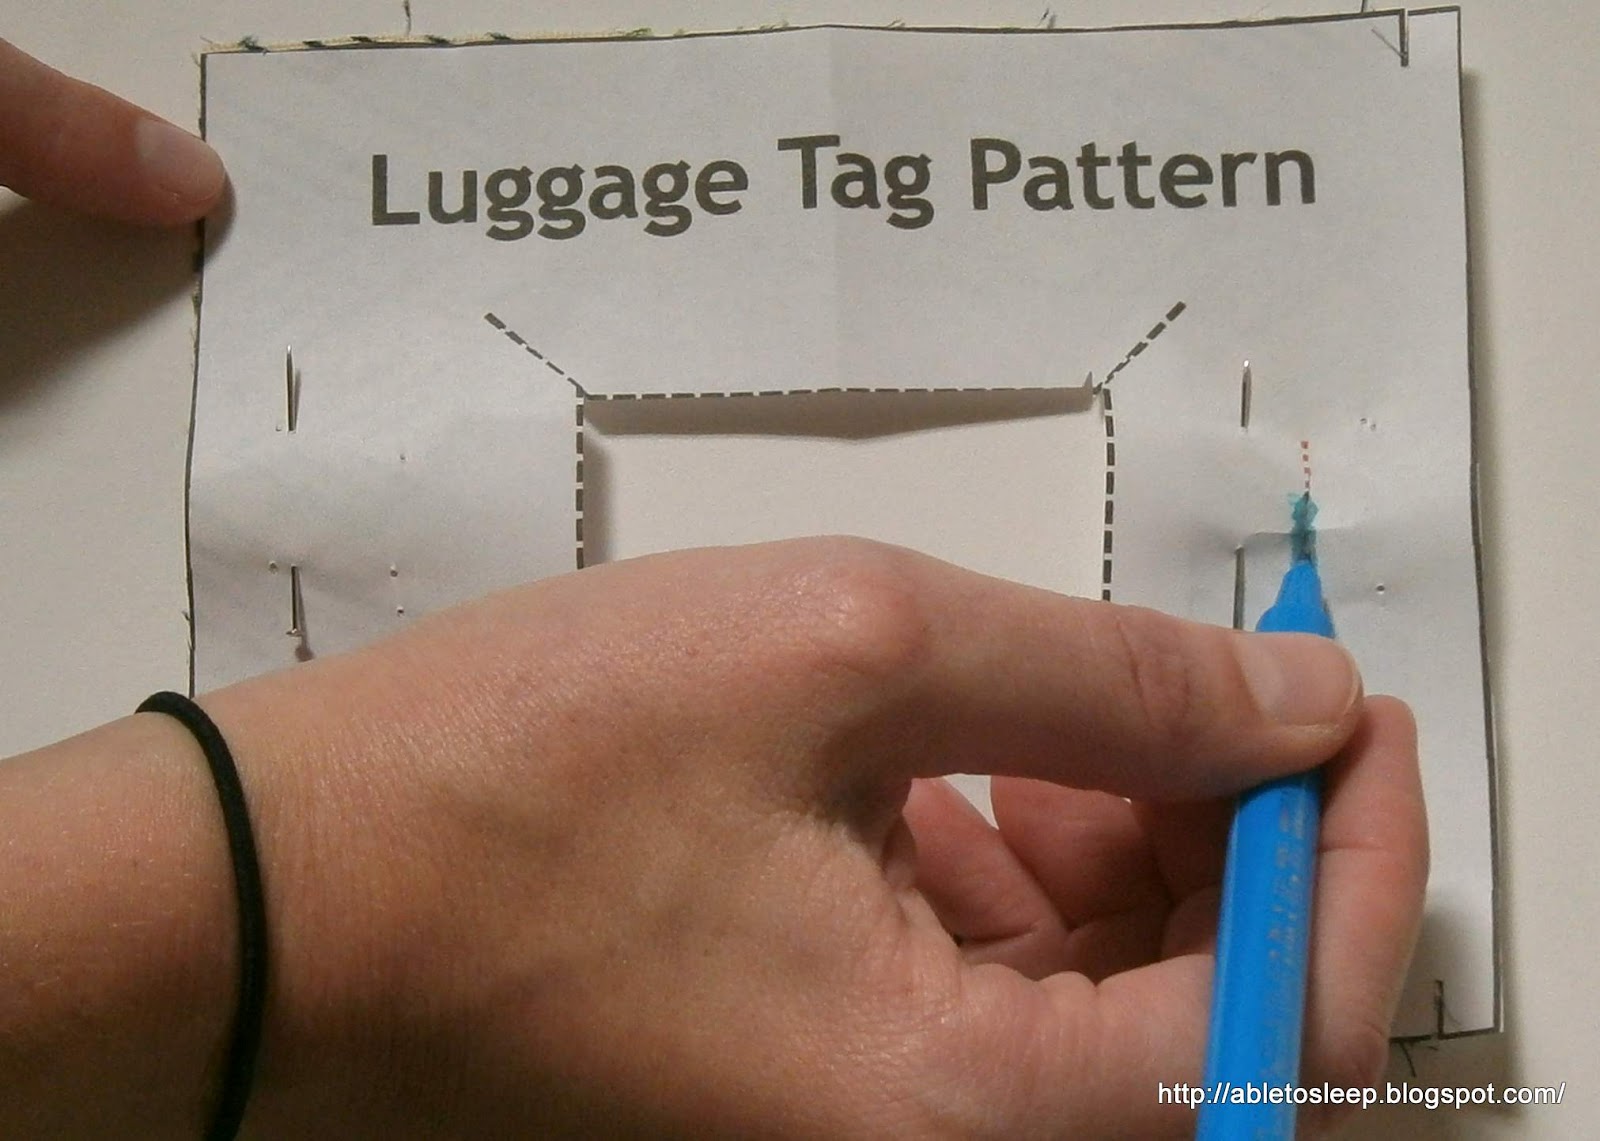
 2. Cut out the tag pattern along the solid black lines (including the notches on the side) and make a slit along the red dashed line. Set aside the "Tag Insert Template" until Step #13.


3. Use the pattern to cut out two pieces of fusible interfacing and two pieces of fabric. Notch the fabric where indicated. Do not cut the fabric along the (red or black) dashed lines.


4. Iron the interfacing onto the wrong side of the fabric.


 5. Set aside one piece of fabric. Take the pattern and cut out the rectangle and along the black dashed lines in the center. Pin the pattern to one of the pieces of fabric and cut out this square and dashed lines from the fabric.


6. Iron the flaps in the center towards the wrong side of the fabric to create a "window" in the middle.

7. On both pieces of fabric, fold over the top of the fabric where you notched it earlier. Iron along the fold.


8. Top-stitch very close to the edge of the window that you have created. Also top-stitch slightly less than 1/4" from top edge that you ironed on both pieces. Trim excess fabric from around the window.


**Top-stitching Tip** Instead of back-stitching to lock the stitches when you top-stitch, leave a long length of string (about 4") hanging when you sew. When you are done sewing, take a hand-sewing needle and pull the strings from the front to the back of the fabric. Tie the ends of all four strings in one knot and trim the strings. This gives a cleaner appearance to your top-stitching.


9. Using the slit (red dashed line) on the pattern as a guide, draw a line on the right side of each piece of your fabric. Make a button hole on each piece of fabric separately at the location you have drawn your line. 


**Don't know how to make a button hole?** Check out these resources: Here are the instructions that came with my machine for creating a button hole. This video shows a nearly identical process. I am assuming that most machines have similar procedures.


10. Pin your two pieces of fabric right sides together. Make sure the edges and button holes line up. Sew with a 1/4" seam allowance. Notch the corners and trim the excess fabric.


 11. Turn your tag right side out and push out the corners. (I use a chopstick.) Iron the tag.


12. Top-stitch around the three sides of the tag that are not already top-stitched.

13. Make an insert for your tag using the template and cardstock or scrapbooking paper. Slide the insert into the tag so that it is visible through the window. (You may want to laminate your insert for a bit more durability.)


14. Tie ribbon through the loop.

15. Admire your handiwork!


I am tempted to make tags for everything in my house now...

Friday, March 30, 2012

Smocked Honeycomb Skirt


Have you ever worked really hard on something and just don't like the final result? That is how I feel about this smocked skirt. The one shown in the tutorial on the Victory Patterns blog is so cute! Why didn't mine turn out as well?

I adjusted the waist size several times and put the zipper in twice, but I still don't think that it fits very well. One reason is probably my lack of patience. Another is that the thread in the smocking keeps stretching. The pinched together sections were very tight when I first finished, but now are much looser. I knotted each smocked piece separately because I did not like the "pulled" then "slack" parts shown in the tutorial. Perhaps that is the problem.


Here is the final product. I may try belting it and wearing it higher on my waist. It saddens me to cover all of the smocking, but if I wear it more often, then it is a sacrifice I am willing to make. Or maybe I will continue to adjust the fit in the waist to make it more snug. 


In happier news, I have been doing so much sewing lately. I finished the shirt that I told you about last week and I have another (hopefully better) skirt in the works. I am also toying with the idea of making a quilt!

Friday, March 23, 2012

Patterns: one done, one to do

Today, I am going to the fabric store so I can start a new project. I am going to make the Sorbetto top from Colette Patterns that is posted on their blog, Coletterie. It is free to download. (Have you noticed that I love free?)

Picture from Coletterie

I also finished a skirt last week. It is the Smocked Honeycomb Skirt from Victory Patterns. You can find the tutorial here on their blog. I wanted to show you my finished skirt today, but alas, I have not had a chance to take pictures yet. Check back soon...

Picture from the Victory Patterns blog

Saturday, March 10, 2012

Baby's Crinkle Skirt

Front view

One of my friends has a little girl named Molly that is six months old. (I previously made her a matching onesie and bootie set that you can see here.) I do not know much about babies so I was very entertained to learn that babies love toys that make crinkly noises when they touch them. Armed with this knowledge, I thought it would be very cute to make a skirt for Molly that crinkles. Then she can play even if she doesn't have a toy in front of her.

Back view

\Once, I had a plan, the skirt was fairly easy to construct. I knew that I wanted individual pieces that Molly could grab and crinkle and I knew that I wanted it to be super cute and I knew that I wanted the back to be plain. Maybe a tutorial later...
Inside of the front

I bought way too much material at the craft store because it is hard to comprehend just how tiny baby clothes actually are. But it was nice to have extra for the trial and error of designing from scratch.

I was very pleased with how the skirt turned out. Some of my stitching is crooked, but I think that the overall concept works well. I really love the pink tulle hidden under the crinkle panels, but next time, I would add more!

Wednesday, March 7, 2012

I spy sailboats

Images clockwise from center are from: Old Navy, mengseldesign on Etsy, cotton & curls, Frank & Gertrude on Etsy, Modcloth

I saw the adorable sailboat blouse from Old Navy (center of collage) and was inspired to see what other interesting boat related apparel, accessories, crafts, and  decor that I could find...


Ok, so this one doesn't have any boats on it, but it is a boat neck top and it is a great way to refashion a shirt, so I couldn't resist: 

Friday, March 2, 2012

Coffee Cozy


Perhaps I am crazy, but I don't drink coffee. However, when I saw this tutorial for a Coffee Cozy posted by Jeni from In Color Order on Skip to my Lou, I had to find someone that frequents the coffee shop for which to make it. 


My friend Emily was the lucky winner! (I wonder if my friends like it when I give them homemade stuff or inwardly roll their eyes...) Emily requested a "jewel-tone" color palette. I always have a hard time matching fabrics because I will find one or two that I love and then have to find others that compliment it. Emily didn't complain so I must have done okay. (Side note: I do not know how to quilt, but I love looking at In Color Order because Jeni always uses such beautiful fabric combinations. I will have to use her pictures for ideas.)


This was one of the few tutorials where I followed the instructions exactly as written. The tutorial was really clear and easy to follow. I am very pleased with how it turned out!


Friday, February 10, 2012

My First Garment!


I am very excited about today's post. This tunic is the first (wearable) garment that I have sewn for myself! Let me share with you how it came to be.

I stumbled upon a free pattern from HotPatterns.com for a Fringe Festival Knit Top. I really liked the simplicity of it for my first clothing project. I printed the pattern and cut the fabric. I made one change initially: I cut the back and front as one single pieces rather than splitting them in half as shown on the pattern. I sewed the front and back together at the shoulders. Then the pattern and fabric sat in my "to be sewn basket" for a couple of months...

In the meantime, I started working on one of these dresses:

Picture from Simplicity

I am working on top H with bottom J, if you are interested. The dress is much more difficult than the tunic top, so when I got frustrated with it, I went back to the tunic. The dress is still in the works, but the point of my side story is that working on the dress taught me a couple of new sewing techniques...

When I finally picked up my fabric that I had cut for the "Fringe Festival" top, I decided that I did not really want the scarf part of the shirt. So I made a few changes:

First, I decided to make a finished neckline rather than having the attached scarf. To create the finished neckline, I took the pattern and cut a strip 2.5 inches from the neckline on the front and back. Let's call those 2.5 inch wide pattern pieces my "neckline pattern."


I cut my neckline pattern out of my fabric. (The fabric is folded in the picture below.)


Then, I sewed the front and back neckline pieces together, right sides together.


Next, I pinned the neckline pieces to my previously sewn together shirt pieces, right sides together, and stitched all the way around the neckline.

After sewing the shirt and lining pieces together, I notched the fabric at the "v" of the neck and restitched there to reinforce the "v" shape. (This is one of the new skills that I learned while working on my dress.) After that, I used another one of my new skills. I "understitched" all of the way around my neck seam. Look at this video to see how to do it:


The seam was still not as fixed as I wanted it to be, so I stitched through both pieces to hold down the lining. I then cut off the excess fabric on the inside. This is what it looks like on the inside and outside of the neck: (Forgive my not so straight stitching.)


For the sleeves and bottom, I folded over the fabric and stitched the hem using my new Twin Ballpoint Needle that I bought on Black Friday.


I was a little sad to see that the fabric is puckered-looking between the two rows of stitching. Can anybody tell me why that happened?


I also used the extra fabric to make a belt for the tunic. I just folded a long strip of fabric in half with the right sides together and sewed along the edge to make a long tube. Then, I flipped the tube right side out, folded the ends toward the inside and stitched the ends closed. Super simple.

The last thing that I did was add beads to the neckline. You can see how I did that here. Here is the final product: