Showing posts with label tutorial link. Show all posts

Wednesday, May 16, 2012

Ideas and Inspiration: Quilts

I have been thinking about tackling a quilting project. I am accumulating fabric to make a queen-sized bed quilt, but I think need to practice some smaller quilts/blocks first. I have found some really cool (and free!) resources on the internet. Here are a few:

I started making these right before exams. (Not a good time to start a project...) I have finished one of the quilt blocks and just need to sew together the last four pieces of the other. I will post them soon!

This Craftsy class is free! I learned from the lovely ladies at the Artisan's Square Sewing Forum that when you first register for Craftsy, you can purchase as many classes as you like for $25 each. That is a huge discount!

This is what made me first get interested in quilting. I always thought of quilts as very old fashioned. These blocks are anything but old fashioned!

Monday, April 30, 2012

I spy school

Images clockwise from top left are from: the bookfair, Maybe Matilda, Sweet Potato Chronicles, Target

I have not posted in a little while because I have been overwhelmed by school! I signed up for too many classes this semester. Thankfully, this is the last week. Only a few exams stand between me and more time for sewing. Since I have been consumed with school lately, I thought that I would share some school related goodness. 
 
This Etsy shop was created by Kate of the amazing blog Scathingly Brilliant. When I saw the Book Fair Button with stickers that you can apply as you finish your books, I laughed out loud. Children of the 80s-90s, how much did you love Book-it? I got my free pizza every single month!


I should make myself more bento style meals because I am a grazer. And they are just too cute. (My Love tells me that I eat like a child. I guess this confirms it...)


Friday, April 20, 2012

Sorbetto Top


I recently stumbled across the *free* pattern for the Sorbetto top from Colette Patterns. I immediately went looking for the perfect fabric. I wanted something bright and cheerful for spring and also something that was silky feeling. I found this orange, pink, and brown ikat fabric in the clearance bin! I was so excited about it until I was getting it cut at the store. The lady in line behind me commented on all of the stripe matching that I was going to need to do. I hadn't thought of that! 

Needless to say this took me much longer to make than I originally anticipated. I looked at a lot of websites to find a way to match stripes correctly. The best resource that I found was from the Sewaholic blog. The post is here. It contains a lot of pictures and clear explanations. I did okay for my first striped garment, I think. On the sides, the seams are not perfect, but they are close enough that it is not distracting. One thing that I did not think about when I was cutting the fabric was the position of the dart. I should have made the dart inside one of the large stripes. Live and learn.


The fabric is very sheer so I also bought lining fabric to go underneath. I just cut out the pattern pieces from both the lining and the top fabric and pinned them together like they were a single fabric piece. 


I used French seams on the inside. It makes the inside look so much more clean! I found a good tutorial on French seams on the Coleterie blog. This is by far the prettiest inside of anything that I have ever made.

 
Looking at the pattern, I could tell that the top was going to be short, so I added two inches at the bottom for a little more length. I am not particularly tall (5'4") and I think that my torso is fairly short, but the top was still much shorter than I normally wear. I have worn the top both with jeans (untucked) and with a skirt (tucked in) and I am definitely more comfortable with it tucked in. The top is also a bit tight in the armholes. I am planning on making another Sorbetto top because I really like the style. Next time, I am going to add 0.5" to the top of the pattern to give me more ease in the armholes and several more inches at the bottom for length.

With all of that said, this is my favorite piece of clothing that I have sewn for myself!

Friday, March 30, 2012

Smocked Honeycomb Skirt


Have you ever worked really hard on something and just don't like the final result? That is how I feel about this smocked skirt. The one shown in the tutorial on the Victory Patterns blog is so cute! Why didn't mine turn out as well?

I adjusted the waist size several times and put the zipper in twice, but I still don't think that it fits very well. One reason is probably my lack of patience. Another is that the thread in the smocking keeps stretching. The pinched together sections were very tight when I first finished, but now are much looser. I knotted each smocked piece separately because I did not like the "pulled" then "slack" parts shown in the tutorial. Perhaps that is the problem.


Here is the final product. I may try belting it and wearing it higher on my waist. It saddens me to cover all of the smocking, but if I wear it more often, then it is a sacrifice I am willing to make. Or maybe I will continue to adjust the fit in the waist to make it more snug. 


In happier news, I have been doing so much sewing lately. I finished the shirt that I told you about last week and I have another (hopefully better) skirt in the works. I am also toying with the idea of making a quilt!

Friday, March 23, 2012

Patterns: one done, one to do

Today, I am going to the fabric store so I can start a new project. I am going to make the Sorbetto top from Colette Patterns that is posted on their blog, Coletterie. It is free to download. (Have you noticed that I love free?)

Picture from Coletterie

I also finished a skirt last week. It is the Smocked Honeycomb Skirt from Victory Patterns. You can find the tutorial here on their blog. I wanted to show you my finished skirt today, but alas, I have not had a chance to take pictures yet. Check back soon...

Picture from the Victory Patterns blog

Wednesday, March 7, 2012

I spy sailboats

Images clockwise from center are from: Old Navy, mengseldesign on Etsy, cotton & curls, Frank & Gertrude on Etsy, Modcloth

I saw the adorable sailboat blouse from Old Navy (center of collage) and was inspired to see what other interesting boat related apparel, accessories, crafts, and  decor that I could find...


Ok, so this one doesn't have any boats on it, but it is a boat neck top and it is a great way to refashion a shirt, so I couldn't resist: 

Friday, March 2, 2012

Coffee Cozy


Perhaps I am crazy, but I don't drink coffee. However, when I saw this tutorial for a Coffee Cozy posted by Jeni from In Color Order on Skip to my Lou, I had to find someone that frequents the coffee shop for which to make it. 


My friend Emily was the lucky winner! (I wonder if my friends like it when I give them homemade stuff or inwardly roll their eyes...) Emily requested a "jewel-tone" color palette. I always have a hard time matching fabrics because I will find one or two that I love and then have to find others that compliment it. Emily didn't complain so I must have done okay. (Side note: I do not know how to quilt, but I love looking at In Color Order because Jeni always uses such beautiful fabric combinations. I will have to use her pictures for ideas.)


This was one of the few tutorials where I followed the instructions exactly as written. The tutorial was really clear and easy to follow. I am very pleased with how it turned out!


Saturday, February 25, 2012

Rainbow Thread Organizer

Hello! Sorry for the gap between posts. I was on a little vacation... 

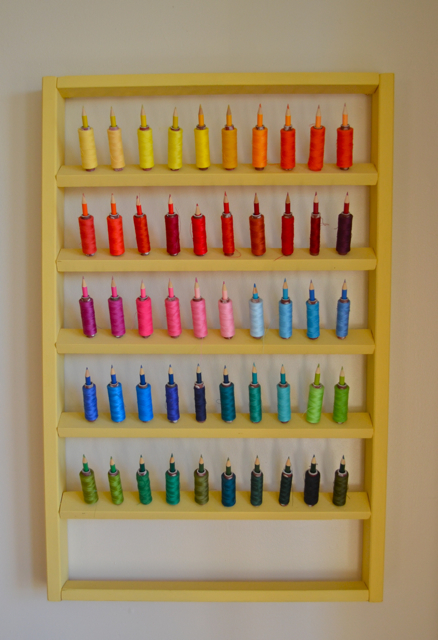
Recently, my father and I collaborated to create an awesome rainbow thread organizer. This project was inspired by this beautiful Rainbow Spool Rack from Robidou:


I think that the colored pencils are a great idea, but I wanted to be able to store bobbins as well as thread, so I needed to use something thinner. I used plain wooden dowels instead. My father did all of the constructing. I just painted everything. I painted the frame black to match my desk and chair.


Long before I actually started sewing, my grandmother gave me her sewing machine along with some thread. The blue thread that is on the wooden bobbin is one from her. I wish I knew how old it is.


I hung my ladybug pin cushion on a couple extra pegs for easy access. I made it using the Bitty Bug Pincushion tutorial from goody-goody. I just added an elastic band to the bottom so that I can wear it on my wrist while I sew.

Wednesday, February 8, 2012

I spy DIY dresses

Images clockwise from top left are from: Freckles in April, Tilly and the Buttons, zilredloh, and Prudent Baby

I am continually amazed by the talent of others! It is clearly seen in these great hand-made dresses. Look out some great DIY-ed dresses that I spied:


Friday, January 27, 2012

Pillow Covers with Invisible Zippers


I finally conquered my fear of zippers. And made new pillow covers. Two birds with one stone! I used a tutorial from one of my favorite blogs, Craftiness is Not Optional. I only did a couple of things differently...

Jess, from Craftiness is Not Optional, suggests cutting the fabric the same size as the pillows, but I just couldn't do it. My pillows are 16"x16". I cut my fabric 17"x17" because I like having (a lot of) wiggle room. I used a 1/2" seam allowance.

I used my new invisible zipper foot that I bought on Black Friday. I was surprised at how easy it is to use and how close it stitches along the side of the zipper teeth.


I did run into one problem. Using the invisible zipper foot, I could not sew around the zipper pull. 


I decided just to sew up the rest by hand.

After completing these pillows, I read a post on another of my favorite blogs, See Kate Sew, about installing invisible zippers. Kate suggest using a regular zipper foot before sewing with the invisible zipper foot. Although I have not tried it yet, I believe this should fix the problem. I guess this is another sewing tip that I learned the hard way. Sewing Tip Learned the Hard Way #4: Use a regular zipper foot to sew around the zipper pull of an invisible zipper.


Even with the zipper issue, the zippers are quite invisible. And I think that the pillows look nice sitting on the couch.