Friday, January 27, 2012

Pillow Covers with Invisible Zippers


I finally conquered my fear of zippers. And made new pillow covers. Two birds with one stone! I used a tutorial from one of my favorite blogs, Craftiness is Not Optional. I only did a couple of things differently...

Jess, from Craftiness is Not Optional, suggests cutting the fabric the same size as the pillows, but I just couldn't do it. My pillows are 16"x16". I cut my fabric 17"x17" because I like having (a lot of) wiggle room. I used a 1/2" seam allowance.

I used my new invisible zipper foot that I bought on Black Friday. I was surprised at how easy it is to use and how close it stitches along the side of the zipper teeth.


I did run into one problem. Using the invisible zipper foot, I could not sew around the zipper pull. 


I decided just to sew up the rest by hand.

After completing these pillows, I read a post on another of my favorite blogs, See Kate Sew, about installing invisible zippers. Kate suggest using a regular zipper foot before sewing with the invisible zipper foot. Although I have not tried it yet, I believe this should fix the problem. I guess this is another sewing tip that I learned the hard way. Sewing Tip Learned the Hard Way #4: Use a regular zipper foot to sew around the zipper pull of an invisible zipper.


Even with the zipper issue, the zippers are quite invisible. And I think that the pillows look nice sitting on the couch.

Friday, January 20, 2012

"Linky Parties"

Being a new blogger, I want to tell everybody about what I am doing. One way to do that is through the "Linky Parties" that other blogs host.


In addition to showing off my work, linky parties give me the opportunity to find out what other fun stuff people are working on. Here are a few of the great things that I saw on linky parties this week:


This week, I posted my Headband Tutorial on several blogs doing linky parties. Check them out because they are pretty cool:


Also, my absolute favorite website to go for craft inspiration is Craft Gossip. I have found many of my ideas on Craft Gossip or on blogs that are featured there. So, as you can imagine, I was very excited to see that they posted my Headband Tutorial! Now I can proudly say:

As seen on CraftGossip.com

Saturday, January 14, 2012

Headband Tutorial

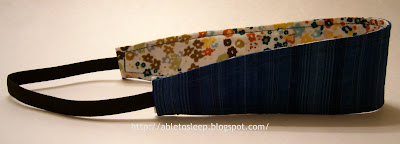
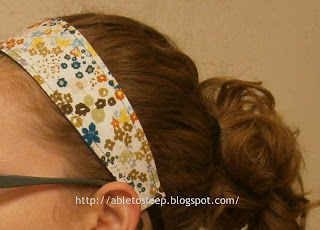
It is very difficult for me to find headbands that stay on my head, hold my hair, and don't give me headaches. I am so demanding! This headband works perfectly. Here is a tutorial for you to make your own.

Supplies
  • Two small pieces of coordinating fabric (about 3"x16" each)
  • Fusible interfacing 
  • About 8-10" of elastic (I prefer 3/8" width)
  • Thread

Directions
1. Print this pattern
2. Fold the fabric in half, pin the pattern in place, and cut out. Repeat for the coordinating fabric and two times on the fusible interfacing
3. Be sure to notch the cut out pieces on the place indicated on the pattern
4. Attach the fusible interfacing (mine is in pieces because I was using up scraps...)
5. Place your fabric pieces right sides together and sew from the notch on one end, following the curve of the fabric, until you reach the notch on the other end. Remember to back stitch at the beginning and the end. The pattern allows for a 1/2" seam allowance. Repeat on the other side of the headband.
6. Trim the excess fabric in between the notches.
7. Carefully flip the headband right side out. It is a tight squeeze, but it gets easier once you get it started. Iron. 
8. At the ends of the headband, where the two sides did not get sewn together, fold in the sides. Iron.
9. Fold over the ends of the fabric and tuck in. Iron.
9. Insert the elastic into the space between the two sides. Pin in place. Carefully try on the headband to test if the elastic is the proper length. (Try not to stick your ears with the pins in the process.) Adjust the length of the elastic, as needed.
10. Top stitch around the entire head band. At the ends where the elastic is placed, stitch back and forth for extra strength.
And you are done! Wear and love.

Friday, January 6, 2012

Scarves!

Recently, a friend and I went on a scarf making frenzy. We started with infinity scarves using a tutorial from Simply Dove.
These scarves are super simple. The one shown here was made out of a flowy, thin material. We also made them out of knit and they all turned out very nice.

------------------------------------------------------------------------- 

Then, we found a great tutorial for a knit scarf from Make It and Love It.
Make It And Love It
The directions were pretty clear, but I have a couple of extra tips:
  • When you are cutting the knit fabric, the direction of the grain/stretch matters. Along the scarf, the grain should be horizontal. Along the small strips of fabric, the grain should be vertical. This makes the strips curl nicely.
  • Stacking the material neatly keeps the knit from stretching too much when you feed it through the machine.
  • Watch both sides of the scarf carefully to ensure the fabric strips are laid out flat when you sew the two sides of the material together.
All done!