I stumbled upon the Ava pattern from Victory Patterns and fell in love! So I started looking around for the perfect fabric and accessories to compliment the dress. Here are my ideas and inspiration:
(This is cotton fabric, so I don't know if the drape is really suitable for this style of dress, but I love the design. I have a hard time buying fabric on-line because I want to feel it first.)
Hello! Sorry for the gap between posts. I was on a little vacation...
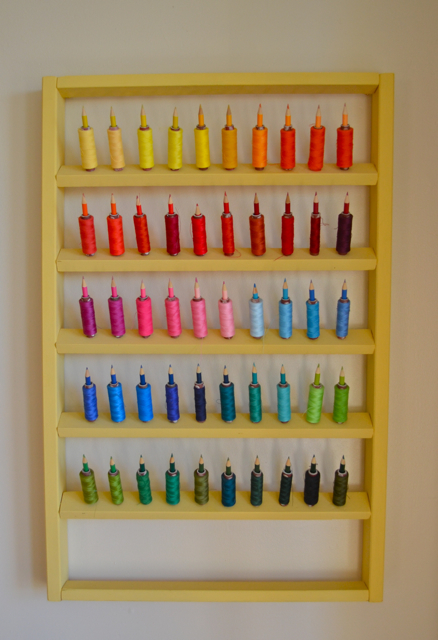
Recently, my father and I collaborated to create an awesome rainbow thread organizer. This project was inspired by this beautiful Rainbow Spool Rack from Robidou:
I think that the colored pencils are a great idea, but I wanted to be able to store bobbins as well as thread, so I needed to use something thinner. I used plain wooden dowels instead. My father did all of the constructing. I just painted everything. I painted the frame black to match my desk and chair.
Long before I actually started sewing, my grandmother gave me her sewing machine along with some thread. The blue thread that is on the wooden bobbin is one from her. I wish I knew how old it is.
I hung my ladybug pin cushion on a couple extra pegs for easy access. I made it using the Bitty Bug Pincushion tutorial from goody-goody. I just added an elastic band to the bottom so that I can wear it on my wrist while I sew.
I am very excited about today's post. This tunic is the first (wearable) garment that I have sewn for myself! Let me share with you how it came to be.
I stumbled upon a free pattern from HotPatterns.com for a Fringe Festival Knit Top. I really liked the simplicity of it for my first clothing project. I printed the pattern and cut the fabric. I made one change initially: I cut the back and front as one single pieces rather than splitting them in half as shown on the pattern. I sewed the front and back together at the shoulders. Then the pattern and fabric sat in my "to be sewn basket" for a couple of months...
In the meantime, I started working on one of these dresses:
I am working on top H with bottom J, if you are interested. The dress is much more difficult than the tunic top, so when I got frustrated with it, I went back to the tunic. The dress is still in the works, but the point of my side story is that working on the dress taught me a couple of new sewing techniques...
When I finally picked up my fabric that I had cut for the "Fringe Festival" top, I decided that I did not really want the scarf part of the shirt. So I made a few changes:
First, I decided to make a finished neckline rather than having the attached scarf. To create the finished neckline, I took the pattern and cut a strip 2.5 inches from the neckline on the front and back. Let's call those 2.5 inch wide pattern pieces my "neckline pattern."
I cut my neckline pattern out of my fabric. (The fabric is folded in the picture below.)
Then, I sewed the front and back neckline pieces together, right sides together.
Next, I pinned the neckline pieces to my previously sewn together shirt pieces, right sides together, and stitched all the way around the neckline.
After sewing the shirt and lining pieces together, I notched the fabric at the "v" of the neck and restitched there to reinforce the "v" shape. (This is one of the new skills that I learned while working on my dress.) After that, I used another one of my new skills. I "understitched" all of the way around my neck seam. Look at this video to see how to do it:
The seam was still not as fixed as I wanted it to be, so I stitched through both pieces to hold down the lining. I then cut off the excess fabric on the inside. This is what it looks like on the inside and outside of the neck: (Forgive my not so straight stitching.)
For the sleeves and bottom, I folded over the fabric and stitched the hem using my new Twin Ballpoint Needle that I bought on Black Friday.
I was a little sad to see that the fabric is puckered-looking between the two rows of stitching. Can anybody tell me why that happened?
I also used the extra fabric to make a belt for the tunic. I just folded a long strip of fabric in half with the right sides together and sewed along the edge to make a long tube. Then, I flipped the tube right side out, folded the ends toward the inside and stitched the ends closed. Super simple.
The last thing that I did was add beads to the neckline. You can see how I did that here. Here is the final product:
I just completed one of my first garments! I made a tunic from a deep purple knit. But you have to wait until next week to see it... Will the suspense kill you?
After I sewed the neckline of the shirt, I was unhappy with how it turned out, so I wanted to hide modify it a bit. I decided to add a row of beads around the neck. I was not quite sure how difficult this would be, but I headed to the craft store and found beads and a beading needle (which I promptly bent, oops) and set to work. I was pleasantly surprised by how easy it is. I learned that you can add beading in essentially three steps:
Helpful tip: knot the thread through the back side of the fabric every five beads or so. That way, if the thread ever breaks, all of the beads will not fall off.
The beads are not perfectly straight, but I think that it adds character! I am going to have to beadazzle more clothes now! Check back next week to see the completed tunic.
When I am not spending my free time sewing, I also love to peruse the internet looking at other blogs, Pinterest, etc. So I have decided to share some of my favorite finds with you!


